Table of contents > Full widget definition syntax and more widgets
The way we have been using to define widgets associates each widget with the kind of data it is meant to edit. Booleans are associated with the check button, strings with the string entry, integers and floats with the intfloat entry. That is, each kind of data is associated with only one widget.
That way of defining widgets is very simple, straightforward and useful, but it has its limitations. What if we wanted a widget other than the string entry to handle our string value?
For instance, check the function below:
### node meant for receiving text (first version)

def get_word_count(text:str=''):

    return sum(
             len(line.split())
             for line in text.splitlines()
           )

main_callable = get_word_count
Even though single-line strings are fine, considering the name of the parameter ("text") and the body of the function we can see that the function can handle multiline string as well. The string entry widget is not suited for displaying a multiline string, though.
We can't use the syntax we learned here to request another widget though, because it would also hand string data and, as we already know, using str as the annotation and a string as the default value would define a simple string entry widget.
We would clearly need another way to define widgets so that we could be more specific about:
Fortunately, this more complete syntax is already available. In fact, the syntax we have been using so far, though very simple, straightforward and useful, is actually syntactic sugar to speed up simple widget definitions in the full syntax to be presented.
The full syntax allows complete control over our widget definition and is actually simple as well. Just like with the syntactic sugar we have been using until now, you still just need an annotation and a proper default value.
The only difference is that the annotation is now a dictionary containing information about the parameter. Such information consists of:
| Key (string) | Value |
|---|---|
| widget_name | a string representing the widget we want |
| widget_kwargs | (optional in some cases) a dictionary representing additional keyword arguments to configure the widget |
| type | the expected type(s) of the parameter |
Now that we know the full widget definition syntax, we can finally be precise about which widget we want and its configuration.
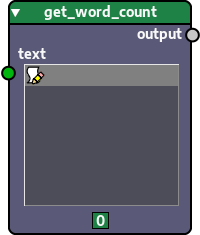
For instance, below we present the same get_word_count() function from before, but this time we request the text display widget for the text parameter using the full syntax we just learned:
### node meant for receiving text (second version)

def get_word_count(

      text: { # here we use a dict to provide metadata
              # about the 'text' parameter; remember
              # that the 'widget_kwargs' key is optional;

        'widget_name': 'text_display',
        'type': str,

      } = '' # default value (still needed)

    ):

    return sum(
             len(line.split())
             for line in text.splitlines()
           )

main_callable = get_word_count
The text display widget, as the name implies, is much more suited for displaying text. Here's what our node looks like now:
The full list of available widgets and their configuration options can be found in the Widget configurations appendix.
As we just learned, the full widget definition syntax allows us to request any widget we want and to provide extra configuration for it. Let's see more examples in the next sections.
One of the advantages of working with node editors is how good they are to edit media, like images for instance. A recurring kind of data we deal with when working with images is colors.
Here's an useful widget to store and edit colors, versatile enough to handle both a single color and multiple colors as needed. Here's how it is defined:
### node with widget to hold and edit colors

### third-party import
from pygame import Surface


def get_solid_color_surface(

      width  : int = 100,
      height : int = 100,

      fill_color: { # color button widget defined here

        'widget_name': 'color_button',
        'type': tuple,

      } = (255, 0, 0) # default value is the red color

    ):

    ### create surface
    surf = Surface((width, height)).convert()

    ### ensure fill color is a solid color by using only
    ### the first three values (values of red, green and
    ### blue channels)
    fill_color = fill_color[:3]

    ### finally fill the surface with the given color and
    ### return it

    surf.fill(fill_color)

    return surf

main_callable = get_solid_color_surface
And here's the resulting node:
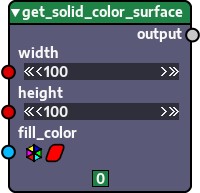
The color button also has extra options. One of them is used to define whether color values should be represented by tuples (as in the example above) or strings (for instance, "#ffffff"), in case your function can process colors using such notation. Remember: all available widgets and their options can be found in the Widget configurations appendix.
To edit the color(s) in the widget, click the icon to the left of the widget. If click the colors, though, a dedicated color viewer will popup allowing to see the colors in action in different contexts like as a color list or pattern drawings.
Besides allowing the definition of additional widgets, the full widget definition syntax also allows you to define extra options for seemingly simple widgets, like the entry widgets previously presented (the string entry and intfloat entries). We are now going to explore some of those options.
The string entry is even more powerful than it appears. Besides allowing you to edit strings, it also has an option to validate what kind of string the widget can hold. Here's what we'd do, for instance, if we wanted to ensure the value on the widget is alphanumeric:
### string widget which accepts only alphanumeric strings

from pygame.color import THECOLORS

def pygame_color_by_name(

      color_name : {

        'widget_name'   : 'string_entry',

        'widget_kwargs' : {
          'validation_command': str.isalnum,
        },

        'type': str,

      } = 'red'

    ):
    return THECOLORS[color_name.islower()]

main_callable = pygame_color_by_name
Look at the return statement of the function above. Note that we use a lowercase version of the received color_name argument. In addition to make that lowercase transformation, if we wanted to also ensure the value in the string entry was lowercase, we could also provide an extra option to format the values typed in the string entry:
### string widget which accepts only alphanumeric strings
### and automatically formats typed values to lowercase

from pygame.color import THECOLORS

def pygame_color_by_name(

      color_name : {

        'widget_name'   : 'string_entry',

        'widget_kwargs' : {
          'validation_command': str.isalnum,
          'formatting_command': str.lower, # just added this
        },

        'type': str,

      } = 'red'

    ):
    return THECOLORS[color_name.islower()]

main_callable = pygame_color_by_name
Adding the extra option here might be overkill though, since the function already does the lowercase conversion in the return statement. We just wanted to show you that you could do it if you wanted. The conversion in the return statement should not be removed in this case though, regardless of whether you use the extra formatting_command option or not, because the node might receive the value via the input socket rather than from the widget, in which case the extra formatting would not be applied. The formatting option can be a very useful tool or nice convenience in some cases, though.
The intfloat entry is another widget that has a lot of extra options. Here we're going to see just two of them, the ones that allow us to define minimum and maximum values for the number typed.
Here's a node whose intfloat widget has a minimum value defined:
### intfloat widget which accepts only integers > 0

def get_zero_list(

      quantity_of_zeros : {

        'widget_name'   : 'intfloat_entry',

        'widget_kwargs' : {
          'min_value': 1,
        },

        'type': int,

      } = 1

    ):
    return [0 for _ in range(quantity_of_zeros)]

main_callable = get_zero_list
As we said, the maximum value can be provided as well. Here's another example where we provide it:
### intfloat widget with minimum and maximum values

def hue_is_near_red(

      hue: {

        'widget_name'   : 'intfloat_entry',

        'widget_kwargs' : {

          # hue values range from 0 to 360 (though
          # 360 is the same as 0)

          'min_value': 0,
          'max_value': 360,

        },

        'type': int,

      } = 0

    ):
    return True if hue > 350 or hue < 10 else False

main_callable = hue_is_near_red