Table of contents > Basic way to define widgets
Widgets are very useful integral tools in a node editing workflow since they facilitate the task of specifying and editing different kinds of data or reference useful files from the system.
As you know, Nodezator automatically converts callables into nodes. Like most things related to nodes, the widgets used are also defined in the callables themselves. No need to import anything else.
A widget is defined by providing an annotation and a default value for a parameter. Except for a single corner case which doesn't require a type hint, all widgets need both a type hint and a default value to be defined.
Translating to human language, it is as if the annotation means "the kind of data to be edited" and the default value means "the initial value for the widget to hold".
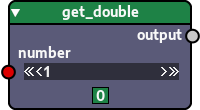
For instance, here we define a widget to edit integers:
### widget to edit integers

## note that we provide an annotation and a default value
## to the 'number' parameter below in order to define
## the widget

def get_double(number:int=1):
    return number * 2

main_callable = get_double
The resulting node:
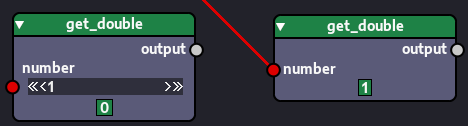
It is also important to note that widgets do not limit the freedom of your nodes, they do not prevent the parameter to receive other kinds of values if so desired. The value in the widget will only be used if there's no incoming data from another node to the parameter.
For instance, in the image below, the widget in the number parameter of the node to the left will have its value used, since the socket doesn't receive a value from a connection, but the number parameter of the node to the right will receive incoming data via the connection to the socket. That's why the widget is hidden, since it is as if it doesn't exist. If the connection to the number parameter in the node to the right is severed, the widget will appear again.
From now on we'll be briefly presenting each widget available in Nodezator and its purpose, as well as different ways available to define widgets.
The simplest possible widget, however, doesn't even require an annotation: if you provide a default value without an annotation, a greyed out, uneditable widget holding the value will appear in the node.
This is the only case of a widget that doesn't need both an annotation and a default value to be defined. We call it a default holder. Here's an example:
### defining a "default holder" widget

def get_double(number=2):
    return number * 2

main_callable = get_double
Resulting node:
It's purpose is to communicate that the parameter has a default value. For instance, since Nodezator can turn any callable into a node, you might want to turn an existing callable from a module into a node and, if any argument has a default value, it will be shown as a default holder in the node.
You may also use the default holder as a way to convey one of the following messages:
A simple widget like the check button is very easy to define. You just need to use bool as the type hint and a boolean value (either False or True) as the default value and you are set. Here's how we'd do:
### defining a check button widget

def get_favorite_color(include_alpha:bool=False):

    if include_alpha:
        return (0, 0, 255, 255)

    else:
        return (0, 0, 255)

main_callable = get_favorite_color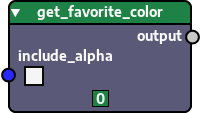
In other words, you told Nodezator that you expected that parameter to receive a boolean and that its default value was False (a boolean), so it automatically picked the check button widget for you.
The check button provided makes it very straightforward to edit the value on the parameter: by just clicking the check box the value of the widget is changed.
What if, instead of a boolean, we wanted a widget to edit a string? We would just do the same as we did to define the check button widget, but use the type str as the type hint and a string as the default value:
### defining a string entry widget

def get_hello_message(name:str='Martha'):
    return f"Hello, {name}"

main_callable = get_hello_message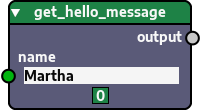
Now you can easily edit the string value passed to the node. Just click the widget and edit the text like you would edit a text input in any other app.
Even though we'll present a more appropriate widget for editing text (multiline strings), the contents of a string entry can also be edited in the text editor by pressing <Ctrl+T> while the entry has the focus. We don't encourage it, since though you can edit multiline strings this way the string entry widget isn't fit for displaying multiple lines of text.
As the name implies, the intfloat entry is an entry specialized in the edition of integer and/or float values. You define basic intfloat entry widgets in the same way as the string entry, but using the corresponding numeric types and default values. Here's how you would define an intfloat entry to edit an integer:
### defining an intfloat entry widget to edit an integer

def get_multiple_spaces(quantity:int=0):
    return ' ' * quantity

main_callable = get_multiple_spaces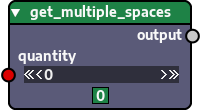
The intfloat entry has extra features for editing numbers that you wouldn't find in a common entry widget.
In the get_multiple_spaces() function above, for instance, say you want to type the triple of 777. You can just type 777 * 3 and hit enter and the value will be set in the widget.
You can perform multiple operations and even include some well-known Python functions, like this: sqrt(25) * 20 / 2. The exact functions that can be used can be found in the Int float words appendix.
You can also click & drag to the sides to decrement and increment the value. While doing that, you can make the decrements/increments more subtle by keeping the <Shift> key pressed.
While typing in the entry you can expand it horizontally so you have more space to type until you are finished editing. To do so, just click the entry to give it focus then press <Ctrl + E>.
Because our intfloat entry above was defined with the int type, the results of all expressions and all values typed will be constrained to an integer using round().
If you want to use floats instead, just define your intfloat entry with the float type and all results/values will be constrained to a float using float():
### defining an intfloat entry widget to edit a float

def get_half(value:float=0.0):
    return value / 2

main_callable = get_half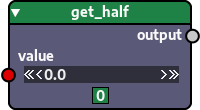
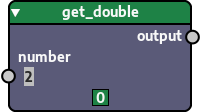
If you want the intfloat entry to accept both integers and floats, just use a tuple with both types as the type hint. The default value also must be either integer or float. Within the tuple the order doesn't matter, so you can use both (int, float) or (float, int):
### defining an intfloat entry widget to edit both
### integers and floats

def get_half(value:(int, float)=0.0):
    return value / 2

main_callable = get_half
As you can see, the resulting node below is identical to the previous one (we even used the same image). The only difference is that we now can type both integers and floats.
It is also common for parameters that accept numbers to also accept None. For instance, the third parameter of pow() accepts None by default, despite also accepting numbers.
Because of that, you can also make the intfloat entry to accept None. To do that, just pass a tuple containing None or type(None) and one or more of the allowed numeric types (int and float) as the type hint. If the type hint is numeric but the default value is None, an intfloat entry which accepts None will be created as well.
### different ways to define intfloat entries

def function_name(

      param_a: (int, None)   = 0,   # int   + None
      param_b: (float, None) = 0.0, # float + None

      # accepts int, float and None
      param_c: (int, float, None) = 0.0,

      # in all cases above, you could also have used
      # type(None) instead of None and the result would
      # be the same:
      param_d: (int, type(None)) = 0 # int + None

      # likewise, changing the order of the items in the
      # tuples would still have the same result
      param_e: (None, int) = 0 # int + None

      # if the type hint is numeric and the default value
      # is None, the resulting intfloat entry will also
      # accept None
      param_f: int   = None, # int   + None
      param_g: float = None, # float + None

    ):
    return

main_callable = function_name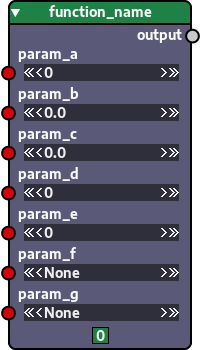
As could be seen in the many ways to define intfloat entries previously presented, Nodezator's purpose is to make defining widgets through annotations as simple, flexible and straightforward as possible.
It is not Nodezator's purpose to enforce a rigorous type system, as some apps do. Annotations in Nodezator are just metadata about what is expected to be received at a given parameter. No type casting is performed by the app.
Also, Nodezator does not follow rigorous/exact type definition conventions like the ones that rely on regular usage of the typing module. Though they might or might not be added as an option in the future.
When deciding about the many ways by which widgets can be requested, we just pick what feels the best/simplest, often with multiple alternatives so anyone can pick what feels best for them.