Table of contents > Defining your first node
Nodezator already comes with a lot of nodes out of the box. We call them app-defined nodes, because they are defined by the app. Such nodes are created from some of the existing functions/classes already included in Python, that is, built-in functions or functions from the standard library.
To use all the power the app has to offer, though, we encourage you to define your own nodes. Such nodes are called user nodes or user-defined nodes or even custom nodes. To define your node, all you need to do is provide a function.
For instance, the function defined below, if passed to Nodezator, will result in the node depicted in the following image.
### example function
def function_name(param1, param2):
    return param1 + param2

main_callable = function_name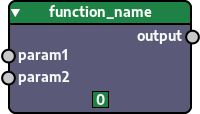
The number at the bottom of the node represents an unique id that each user-defined node instance has. For instance, if you instantiate 10 function_name nodes in a file, each of them will have a different id. It is defined automatically by the app, so you don't need to worry about it.
Actually, any callable can be turned into a node. Classes and methods, for instance, can be turned into nodes as well. Additionally, some kind of callables might need extra steps before they can be turned into a node.
You can put the definition of your nodes anywhere you want in your disk and Nodezator will load them for you, as long as you store them in a certain way, that we'll present in the next section. In other words, your write your node definitions in your disk using your favorite text editor or IDE and use Nodezator to load them. Nodezator's interface is not used to define nodes (at least not for now), just to load them so you can create, edit and execute your graphs.
So launch your favorite text editor/IDE and follow the instructions in the rest of this chapter in order to create your first node, then, once it is ready, launch Nodezator so you can load and use it.
The first thing to do when defining one or more nodes is to think of the purpose for which you are creating the node(s). I'd like to create nodes to generate 2d points representing movement (for instance, for game characters).
With that in mind, we'll create a folder wherein to store all the nodes we are going to create. Let's name it points2d. In Nodezator, we consider that folder to be a node pack. Think of a node pack like a set of cards for a specific kind of game. You can create that node anywhere you want in your disk.
The same way a set of cards is suitable for playing specific kinds of games, node packs contain nodes used for a specific purpose. Uno cards are designed for playing Uno, Yugi-Oh cards for playing fictional monster battles. Just like that, each node pack should be designed for a specific purpose.
Also, avoid using names that are too generic for your node pack, or a name that is used by another library you plan to use. Node packs are treated like modules/packages inside Nodezator and may thus shadow existing libraries. For instance, if you are creating nodes for generating charts with matplotlib, please, do not call your node pack matplotlib, since it will cause you problems when loading your nodes.
Additionally, the name of your node pack is used in import statements (it is treated like a package) whenever you want to export your graphs as pure Python code, so make sure the name of your node pack is a valid Python identifier, that is, it must be comprised only by letters, digits and underscores and it must start with either a letter or an underscore. You can verify that by checking whether the name returns True when passed to str.isidentifier(). Just fire your Python interpreter and type this, replacing nameofmynodepack by the name or your node pack:
>>> str.isidentifier('nameofmynodepack')
True
Finally, though not required, it is recommended that you use only lowercase letters and digits and no underscores at all, since this is how packages/modules are usually named in Python. It is just a convention though, so do what you like. The nodezator project itself has some example nodes packs that use underscores in their names. I actually use underscores for the names of node packs that are meant to be loaded from disk (for instance, examples_node_pack), whereas node packs meant to be installed from PyPI (with the pip command) follow the convention of not using underscores (like mynodepack). However, this is all personal choice.
Just like playing cards are organized in categories, your nodes must be too. In Uno, cards are categorized as Number cards, Draw 2 cards, Reverse cards, and so on. You can categorize your nodes as you see fit. Let's create another folder inside points2d called point_creation wherein we'll store nodes responsible for creating new points. This folder is what we call a category folder
The name of your category folders are also used in import statements whenever you want to export your graphs as pure Python code, so make sure they are valid Python identifiers as well (preferably comprised only of lowercase letters or lowercase letters and digits).
Within our point_creation category folder we'll finally create our node, which will be represented by a folder containing our node script, a node script folder. Why do we use an entire folder just to store our node script? Because this way you can guarantee that your node script has all the resources it needs in a single place.
Even though a node is defined by a function (or other callable) it doesn't mean your node script will be comprised of just a single function in a Python file. It may need to define and import other local modules or load other files like images or databases, it all depends on what you want to do.
That's why a whole folder is used to store your script. Internally, this folder is actually treated as a subpackage of your node pack. You can think of this folder as an entire package wherein you define your node even if it ends up only needing a single file containing a single function. Moreover, even if your node starts as a single file it may grow over time as you further extend it.
You can go as simple or as complex as you'd need/like. Think of the folder containing your node script as the personal limitless playground of your node. In our case, though, the first node we'll create, due to its simplicity, will need just a single Python file inside its folder.
Just like the names of node packs and category folders, the names of your script folders are also used in import statements whenever you want to export your graphs as pure Python code, so also make sure they are valid Python identifiers (preferably comprised only of lowercase letters or lowercase letters and digits).
The python script referencing a callable used to define a node must always be named __main__.py. In case you are wondering why do we use such naming convention, the answer is that it is already used in Python to indicate the main file in a package, the file controlling the execution of a program.
Our first node will create the points of a circle. This may be useful for instance, to define circular movements for game characters. We'll name its folder get_circle. Below is the code defining our node in the __main__.py file within our get_circle folder. Note that the name of the function to be turned into a node also is get_circle.
### function defining the get_circle node
### points2d/point_creation/get_circle/__main__.py file

from math import pi, sin, cos

def get_circle(
      quantity : int          = 30,
      radius   : (int, float) = 100,
    ):
    """Return points forming a circle.

    Parameters
    ==========
    quantity (integer)
        quantity of points forming the circle.
    radius (int or float)
        radius of the circle.
    """
    circle_points = []

    for k in range(quantity):

        value = (k * 2 * pi) / quantity

        x = radius * cos(value)
        y = radius * sin(value)

        circle_points.append((x, y))

    return circle_points

main_callable = get_circle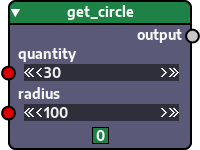
As you can see, our node is actually just a regular Python function. The only additional change required was the creation of the main_callable variable pointing to the callable to be used as a node.
No other change is needed. No need to import a special node class or anything like that. In other words, your code is kept untouched and as free as possible from foreign code and is thus easier to read and maintain. It is just your own code, after all. Nodezator will do all the rest for you, turning your function into a node.
Additionally, since the node script folder is treated like a Python package, remember to use relative local imports in all your local Python modules/subpackages inside your folder, that is, if you have other Python modules inside your node script folder other than __main__.py.
With all that explained, we just have to say "Congratulations!". You successfuly created your first node!
There's still a lot to learn about defining nodes and it is all explained in the next chapters. However, you might be itching to load and test your first node in Nodezator right away. If want to do so, just follow these quick steps:
Congratulations again on executing your first node!
Well, this is fine, but don't you agree that 2D points forming a shape are better visualized as an image rather than text printed on the screen? Wouldn't it be better to see the circle itself rather than reading the text showing the points? This is the topic of the next chapter about defining viewer nodes, where we'll create another node to help us visualize our data with custom graphics.
Here's a review of the anatomy of a node pack so you don't forget it:
a_node_pack a_category_folder a_node_script_folder __main__.py ... (more files/folders, optionally) ... (as many node script folders as you desire inside each category) ... (as many category folders as you desire)
| # | Name | Description |
|---|---|---|
| Node pack | single folder at top of hierarchy; holds all nodes within categories; must have at least one category folder; name must be a valid Python identifier | |
| Category folder | node pack can have as many category folders as needed; each category folder must have at least one node script folder; name of category folder must be a valid Python identifier | |
| Node script folder | category folder can have as many node script folders as needed; each node script folder represents a node; each node script folder must have a __main__.py script (and optionally other local modules as well); name of node script folder must be a valid Python identifier | |
| __main__.py script | must have a 'main_callable' variable pointing to the callable to be turned into a node. |
In Nodezator each node is completely independent from one another. It means their scripts don't import/access values/objects from each other. This is something that is encouraged by the design of the node packs: each node is defined in its own dedicated script.
However, it doesn't mean your nodes can't access external resources/data that is common to them. This is actually necessary in many cases. You accomplish this in the same way you would for any other Python project: with custom modules/libraries/packages. Just create a module containing the values/objects you want to share with your nodes and put it somewhere your Python interpreter can see, then import it from your node scripts.
That location is usually where you put your user-installed packages: either in one of the paths provided by site.getsitepackages() or the path provided by site.getusersitepackages(). Unless you know what you are doing, it is probably better to use one of the locations from site.getsitepackages(), because they are specific to the virtual environment of your interpreter (or main installation, if it is not using an environment), whereas the location from site.getusersitepackages() can be seen from any virtual environment and the main installation.
For instance, if you have 02 (two) nodes with the signatures change_contrast(image:MyImage, contrast:int=50)-> MyImage and change_brightness(image:MyImage, brightness:int=50)-> MyImage, that is, nodes that use the same custom image class MyImage, then you'll want to put the definition of MyImage in a custom module/library. Then, in the scripts of both nodes, you may import that class as usual: from mycustomlib import MyImage.
This mechanism can be used to share values (like constants, enums, etc.), custom classes (like the custom class we used in the previous examples) or custom functions and other callables used internally in your node scripts.
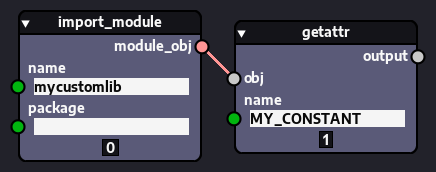
You may even decide not to import these objects inside your node scripts, if you wish. Instead, you may want to access them directly in your graph by importing them from that custom library using the importlib.import_module node. For instance, if you have a custom library called mycustomlib and want to import a constant called MY_CONSTANT from it, you can do it like so:
Finally, you can name your custom module/library/package whatever you want, but since it was created with the purpose of providing common resources for your node pack, we recommend that you pick a name that is related to your node pack. We are still pondering about naming conventions and experimenting with them for now. In the future we may pick some naming convention recommendations, but you don't need to worry about that: As long as you use names that are valid Python identifier as discussed previously and don't clash with names of existing libraries you'll be fine.
And again, always avoid using names of libraries that already exist, in order to avoid name clashes.
Starting from Nodezator version 1.4.0, nodes related to callable objects, that is, all user-defined nodes and some app-defined nodes exist in 01 of 03 different modes:
The image below shows the same node in different modes:
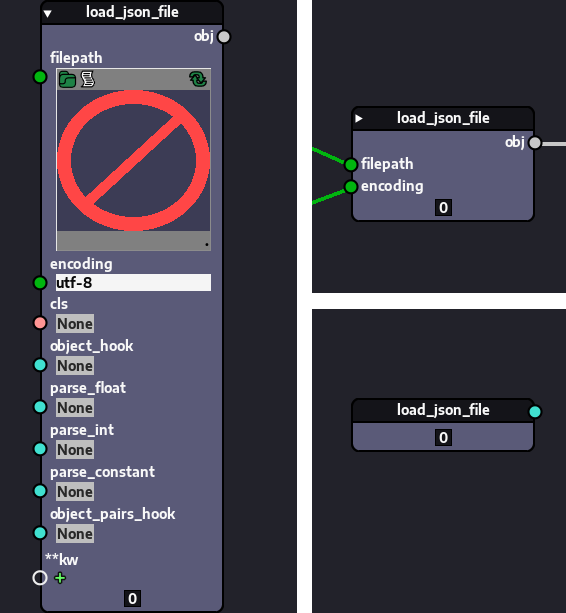
The node to the left is in expanded signature mode. The one in the upper right corner is in collapsed signature mode and the one below it is in callable mode.
Nodes are instantiated in expanded signature mode (expanded mode for short). In this mode, the node represents a function call, that is, it expects inputs and returns outputs when it is executed. It is said that the node is "expanded" because in this mode the node shows all of its signature elements, that is, the parameters and outputs defined in its signature. It is the largest representation among the existing modes.
In collapsed signature mode, the node also represents a function call and works just like in expanded mode, but instead of showing all the signature elements, it only shows those which are connected via sockets, hiding everything else. This is why we say the node is "collapsed".
Regardless of whether a node is in expanded or collapsed signature mode, widgets attached to parameters/subparameters that have a connection to their sockets will be hidden. This is so because incoming data via connections have priority over data provided by widgets. So widgets shadowed by connections are hidden, since they serve no purpose while the socket is connected. If the socket is disconnected, the widgets becomes visible again.
Users can quickly switch between the two signature modes (expanded and collapsed) by clicking in the small arrow icon shown in the upper left corner of user-defined nodes.
You can also switch modes by right-clicking a node and accessing the Change mode to submenu, from which you can pick the mode you desire. You must use this method if you want to switch into or from the callable mode, since the small arrow icon only switches between expanded and collapsed modes.
In callable mode, rather than representing a call, the node represents the underlying callable itself. That is, when the graph is executed, instead of the node being executed directly, it just passes along a reference to its underlying callable. In other words, the node doesn't have inputs or outputs, since it is not a call. It has only a single socket beside its title that can be used to pass the reference to other nodes.
Used wisely, this mode is quite powerful, since it brings a lot of versatility, allowing you to achieve complex tasks with a smaller amount of nodes while retaining total control over the end result. Understanding this requires extra knowledge on concepts such as functions as first-class citizens and higher order functions and on programming paradigms like functional programming. Though it is not the purpose/responsibility of this manual to teach/explain those concepts/paradigms, it is our desire to offer users as much useful knowledge as possible on how to make most out of Nodezator, so we intend to include an appendix to our manual dedicated to this sometime in the future.
For now, the callable mode is mentioned in a few chapters further ahead regarding conditional execution and looping in Nodezator and also in the appendix with useful recipes to execute common tasks in Nodezator, since its very useful for many purposes.